Showing posts with label plan for food. Show all posts

Friday, August 10, 2012


FAST FOOD FRIDAY...

"I'm too busy to cook."  "I worked all day."  "I'm Tired."  "It's way too hot out."  "I don't really want to go to the store."   Who hasn't heard or even said these words before?  Should you call for pizza?  Should you pick something up from the nearest drive through?  Nope, neither.  All you need is a little Food Fore-thought.  Fast Food Friday, a planned weekly post, isn't about running out to a local restaurant for take out or calling for delivery.  Fast Food Friday is about having something on hand for those days when cooking just seems impossible or even unappealing. 

With a little planning and preparation, fast food can come straight from our cabinets, pantries, and freezers.  What we are really talking about here is food preservation.  Food preservation can change our future days - take the guess work out of meal prep, allow for an evening of rest not stress, change your grocery bill's bottom line, and of course, nix the expense of drive-thru eatings.  Now those points do sound appealing.

So for many many Friday's to come, check back to see how I plan to never be too busy to cook, not too tired to eat well, not considering if it's too hot out, and best of all, skipping trips to the store.  For today, let's talk about...

Being Intentional

There are many ways to "be intentional" in the kitchen in order to help simplify things for the week ahead.  The following four are ways that I find work very well.

Menu Plans ~ There are times when I sit down and make up a months worth of menus.  I dream of making one giant monthly shop and never stepping through those doors for at least thirty days after.  Ahhhh, but seriously, menu plans help alot.  For one, if you know you're going to have a busy day, you can pull things out the night before, or even set something to cook in the crockpot.  For two, if you create a list from your menu plan, it does minimize time spent shopping and helps keep you from making extra stops.  It also helps me minimize money spent as in "oops, sorry, it's not on the list".   I like to keep lists of menu plans around so that I can refer back when I'm in a rut or short on time.

Keeping essential ingredients on hand

Doubling up ~ whenever possible, if I am making something that freezes well, I double it.  We eat half that night and half go into the freezer for a future meal.  For example, I caught the Barefoot Contessa show today and though I knew I wouldn't be able to whip up all that she was making, the mashed potatoes sure looked good.  I am not one to buy those overpriced premade packages in the store.  I'm a peeler, a cuber, a boiler - you get the idea.  Though I do like something to show for my time.  So I purposely double or sometimes triple the batch and portion freeze the extra.  This works well with soup, re-fried beans, casseroles, pretzel bread, and the list goes on...

BBQ Chicken with Bacon - one of our favorites

Buy it, cook it, freeze it - If I can pull something precooked from the freezer the night before, it really does cut down on time spent in the kitchen that evening.  Last week, I shared how this works with ground beef.  I also like to keep cooked shredded chicken for BBQ sandwiches, pancakes for quick breakfasts, burritos for lunches, crusts for quick pizzas, and shredded beef roast for soup.  There are times when I will have a "precook" morning just to stock the freezer with future meals.

Eat what you have on hand ~  leftovers.   Yeah, I know leftovers may not always sound good, but they are fast and economical.  If you don't want to have the exact same meal again plan ahead.  If I know I'll be making a couple of roast chickens one night, I may pick up tortillas and cheese to make quesadillas out of the leftovers or some Caesar dressing to fix up a salad. 

Just remember, always be thinking about how you can make your future meals easier and you'll have fast food on hand.

This post is shared with Food Renegade.

Thursday, July 26, 2012

Pizza Crust for the Freezer


FAST FOOD FRIDAY...

"I'm too busy to cook."  "I worked all day."  "I'm Tired."  "It's way too hot out."  "I don't really want to go to the store."   Who hasn't heard or even said these words before?  Should you call for pizza?  Should you pick something up from the nearest drive through?  Nope, neither.  All you need is a little Food Fore-thought.  Fast Food Friday, a planned weekly post, isn't about running out to a local restaurant for take out or calling for delivery.  Fast Food Friday is about having something on hand for those days when cooking just seems impossible or even unappealing. 

With a little planning and preparation, fast food can come straight from our cabinets, pantries, and freezers.  What we are really talking about here is food preservation.  Food preservation can change our future days - take the guess work out of meal prep, allow for an evening of rest not stress, change your grocery bill's bottom line, and of course, nix the expense of drive-thru eatings.  Now those points do sound appealing.

So for many many Friday's to come, check back to see how I plan to never be too busy to cook, not too tired to eat well, not considering if it's too hot out, and best of all, skipping trips to the store.  For today, let's talk about...


Pizza Crust for the Freezer

Last Friday, I shared that I buy pizza ingredients in bulk to save money.  Having pizza on the menu once a week can be expensive if you're eating out.  We are frequent-flyers when it comes to eating pizza.  Considering that a month's worth of take out  pizza was costing us $100+, something had to give.  So I began making pizza at home.  We now eat pizza every week for $25.00 a month.  That's quite a savings.  So it totally makes spending a little time preparing crusts and portioning ingredients worth it.


Pizza Crust for the Freezer
(makes three crusts)

9 cups of flour
2 TBSP of yeast
1 TBSP of salt
1 TBSP of honey
4 TBSP of olive oil
2 1/2 cups of warm water (110 -120 degrees)

Start by adding 3 cups of flour and the other ingredients to your mixing bowl.  (Reserve 6 cups of the flour.)  Set mixer on low for three minutes.  When mixture resembles smooth cake batter, begin adding  three cups of additional flour one cup at a time.  Mixture will become stiff like cookie dough.  At this time, switch to working with a dough hook or turn out onto a floured surface to knead by hand.  Working with a dough hook, you want to add in an additional 2 1/2 cups of flour slowly until dough forms a solid ball and the sides of your mixing bowl is clean.  Kneading by hand, you will knead in the 2 1/2 cups of flour slowly until the dough forms a clean ball that is no longer sticky.

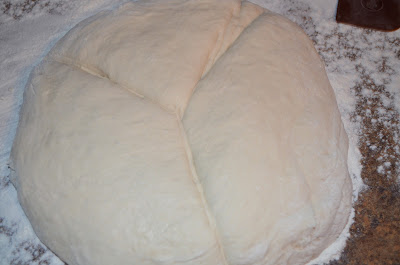
Place dough into a large bowl and cover to rise with a damp warm towel for one hour.  Dough will double in size.  After the hour is up, flour the back of your hand and press down dough.  Turn dough out onto a floured surface and begin pressing it in to a flat circle.  Score the dough with a large Y which will evenly divide it into thirds.  Cut dough into thirds.  Working with one piece of dough at a time, form piece into a ball and then press flat onto the floured surface. Flip dough and begin rolling it out with a rolling pin.  Roll in varying directions to achieve the desired pizza size and shape. 

Lightly fold dough in half and then in half again.  This makes for easier transfer to a baking stone.  Transfer to the stone and unfold.  If needed, shape dough to better fit stone.  You can do this by gently pressing or pulling at the dough.

Bake in a 400 degree oven for 6 minutes.   This partial bake time allows the dough to dry and stiffen for easier freezer storage.  Allow crust to cool completely.  Wrap completely with saran wrap.  Crusts can be stacked and put in freezer.  Crusts will last for up to two months.

To prepare pizza, preheat oven to 400 degrees.  Put frozen crust on to baking stone while oven is preheating.  Add sauce, cheese, and toppings to your liking. (If using meat topping such as ground sausage, it needs to be precooked.)   Bake for 15 minutes or until cheese is golden brown.  Crust can be placed directly on oven rack for a crispier crust.  If doing so, use a pizza peel for easy transferring.

Here it is broken down with pics...


Start by adding 3 cups of flour and the other ingredients to your mixing bowl.  (Reserve 6 cups of the flour.)  Set mixer on low for three minutes. 


Begin adding  three cups of additional flour one cup at a time.  Mixture will become stiff like cookie dough. Add in an additional 2 1/2 cups of flour slowly until dough forms a solid ball and the sides of your mixing bowl is clean. 


Place dough into a large bowl and cover to rise with a damp warm towel for one hour.  


Dough will double in size.  After the hour is up, flour the back of your hand and press down dough.  Turn dough out onto a floured surface and begin pressing it in to a flat circle.  Score the dough with a large Y which will evenly divide it into thirds.  Cut dough into thirds.


Working with one piece of dough at a time, form piece into a ball and then press flat onto the floured surface. Flip dough and begin rolling it out with a rolling pin.  Roll in varying directions to achieve the desired pizza size and shape. 


Lightly fold dough in half and then in half again.  This makes for easier transfer to a baking stone.


Transfer to the stone and unfold.  If needed, shape dough to better fit stone.  You can do this by gently pressing or pulling at the dough.


 Bake in a 400 degree oven for 6 minutes.   This partial bake time allows the dough to dry and stiffen for easier freezer storage.  Allow crust to cool completely.  Wrap completely with saran wrap.  Crusts can be stacked and put in freezer.  Crusts will last for up to two months.


Since we always make pizza in twos, I make this recipe twice so that I have six crusts going into the freezer. Now for the next three weeks, I'll have the makings for pizza on hand.  Which is nice for saving money, but also when cooking efforts need to be kept to a minimum.  Once again, it's about spending a little time now when you have it to make life easier in the future.


So, enjoy, and be thinking of how you can make life easier in the future.

This post is shared with Food Renegade.

Friday, July 20, 2012

Buying in Bulk...


FAST FOOD FRIDAY...

"I'm too busy to cook."  "I worked all day."  "I'm Tired."  "It's way too hot out."  "I don't really want to go to the store."   Who hasn't heard or even said these words before?  Should you call for pizza?  Should you pick something up from the nearest drive through?  Nope, neither.  All you need is a little Food Fore-thought.  Fast Food Friday, a planned weekly post, isn't about running out to a local restaurant for take out or calling for delivery.  Fast Food Friday is about having something on hand for those days when cooking just seems impossible or even unappealing. 

With a little planning and preparation, fast food can come straight from our cabinets, pantries, and freezers.  What we are really talking about here is food preservation.  Food preservation can change our future days - take the guess work out of meal prep, allow for an evening of rest not stress, change your grocery bill's bottom line, and of course, nix the expense of drive-thru eatings.  Now those points do sound appealing.

So for many many Friday's to come, check back to see how I plan to never be too busy to cook, not too tired to eat well, not considering if it's too hot out, and best of all, skipping trips to the store.  For today, let's talk about...


Buying in Bulk...

Buying in bulk can be a great way to save money and have food on hand.   But, it can also be not so great if the extra food you buy just goes to waste.  You really have to have a plan in mind when buying bulk food.  You really should know where and how you're going to store it and how you intend to use it up (with out wasting).  Some things to consider are ... "Do I have enough freezer/cabinet space?", "Do I have zip lock bags for portioning", and "Is this food that I'll really use up?".  The foods I like to buy in bulk are ones that we eat on a weekly basis.  

For example, this week we made a trip to the local Sam's and picked up 1 1/2 pounds of honey ham ($7), 1 1/2 pounds of roast beef ($9),  5 pounds of mozzarella ($12), and 3 pounds of pepperoni ($8).  

Sandwiches and pizza hit the menu weekly around here.  


The lunch-meat quantities don't sound like much for a family of five, but really only two of us eat sandwiches for lunch and that's what this purchase was intended for.  Now when portioned out they make up quite a bit.  I portion out enough to make two to three sandwiches.  Each portion gets wrapped in saran wrap.  All the portions then get put into a labeled freezer zip lock bag.  I ended up with five portions of ham and five of roast beef.  For us, that's five weeks worth of lunch-meat at $16 or $1.20 a week.  If bought from the grocery store, I average spending  $6 a week and having waste.

As for the pizza ingredients, five pounds of mozzarella got portioned into 10 two cup packages and the pepperoni portioned out to 22 packages.  This twenty dollars worth of ingredients will be enough to make ten pizzas or in our case, five weeks worth.  This is a huge money saver for us.   When we order out it is usually around $25 for two pizzas.  

These savings can really add up.  On both accounts, it's easily a 75% savings.  Not to mention, there's future fast food on hand

Ready for the freezer


Remember, it's all about fore thought.  Spend a little time now when you have it and in the future when you need it, you'll have fast food on hand.  If you're wondering how this will make for fast food, I'll be sharing my recipe for frozen pizza crust next week.  Dinner will be done in 20 minutes and it will be as easy as shopping the "freezer section" right in your own kitchen.

Enjoy, and be thinking of how you can make life easier in the future.

This post is shared with Food Renegade.


Thursday, July 19, 2012

Corn and Zucchini Salsa

Corn and Zucchini Salsa

I'm trying to ramp up production in terms of what I'm canning this year. My goal is to make use of all the summer veggies and preserve them in some way for winter eating.   It's a hobby that I enjoy through the summer months and the tasty treats in the winter are a plus too.  Yesterday's CSA bag brought corn and more zucchini so today I tried a salsa recipe.  This recipe is from The Big Book of Preserving the Harvest by Carol Costenbader.  I found it at the library and this is already my third time checking it out.  Yep, it's a good book.  The book has recipes for canning, dehydrating, pickling, and freezing.  


Corn and Zucchini Salsa
Boiling Water Bath Canner (2 one pint jars)

3 medium zucchini, cleaned, trimmed, and diced
1 1/2 teaspoons of salt
2 ears of corn, husked, silks removed
4 tablespoons of olive oil
2 large tomatoes, seeded and chopped
1 cup of fresh lime juice
1/2 cup cider vinegar
2 jalapeno peppers, seeded and minced
1/4 cup finely chopped scallions with tops
3 cloves of garlic, minced
1/4 teaspoon of freshly ground black pepper

  1. Toss the zucchini with the salt and sweat for 3 minutes, rinse and dry on paper towels.
  2. Coat the corn with 2 tsp of oil and roast on a cookie sheet in a 400 degree oven for 30-40 minutes.  Cool.  Cut off the kernels.
  3. Combine the zucchini, corn, remaining oil, lime juice, vinegar, jalapenos, scallions, garlic, and pepper in a heavy sauce pan.  Bring to boil and cook for 2-3 minutes.
  4. Ladle into hot clean jars.  Cap and seal, Process in a boiling-water-bath canner for 15 minutes.

The recipe does not yield much - 2 pints.  When it comes to canning, I like to have a little more than that to show for the efforts.  I ended up doubling the recipe which turned out fine.  There was a little left over for sampling.  It's pretty zippy.  The book suggests eating it with corn chips or putting it on grilled chicken.  I'm thinking it would go nicely with chicken tacos on a soft corn tortilla with a dollop of sour cream.   Either way, there's a little something extra in the cabinet for future days.

What have you been canning lately?

Linked to:


Wednesday, July 18, 2012


The CSA Report 

The CSA Report  will be a regular Wednesday post from now until October.  CSA, Community Supported Agriculture, is still a relatively new term to people so I want to expand on what it is, what it's all about, and what one could get out of it.  For me, I like the idea of getting fresh local produce on a prepaid and regular basis. By joining the CSA, I've made a commitment to local farmers that financially help them start their season. In return, I get the freshest of produce and a variety that I would not normally think to buy.  So I'll also be getting creative in the kitchen.


Week Seven...

Veggies are really starting to roll in now.  In fact, I picked up 16 pounds of baby cucumbers from the CSA today.  The plan is to pickle them using a recipe from Chickens in  the Road.  The recipe she shares recipe for Sweet Gherkins is delicious.  You can see the enormous bag of pickles below.


Lots of tasty things in this week's pick up...

  • Corn on the cob - I'll be canning corn and zucchini salsa tomorrow.
  • Purslane - a green that could quite be considered a weed, but it is rich in vitamin C and omega 3 - I'll be dehydrating it to crumble and add to smoothies for an extra kick.
  • Zucchini - I actually bought extra so I'll be dehydrating some to add to my soup mix for the winter.
  • Basil - Thinking of making pesto.
  • Cucumbers - I'm going to ferment these.  I had success with the last batch, but the taste was off.  I'm going to tweak the recipe.
  • Roma tomato - added this for color - It's the first from my own garden :)
  • Green Beans - Planning to sautee these with a bit of bacon - Yum.

So how's it looking in your bag?

Friday, July 13, 2012

FREEZER COOKING...


 FAST FOOD FRIDAY...

"I'm too busy to cook."  "I worked all day."  "I'm Tired."  "It's way too hot out."  "I don't really want to go to the store."   Who hasn't heard or even said these words before?  Should you call for pizza?  Should you pick something up from the nearest drive through?  Nope, neither.  All you need is a little Food Fore-thought.  Fast Food Friday, a planned weekly post, isn't about running out to a local restaurant for take out or calling for delivery.  Fast Food Friday is about having something on hand for those days when cooking just seems impossible or even unappealing. 

With a little planning and preparation, fast food can come straight from our cabinets, pantries, and freezers.  What we are really talking about here is food preservation.  Food preservation can change our future days - take the guess work out of meal prep, allow for an evening of rest not stress, change your grocery bill's bottom line, and of course, nix the expense of drive-thru eatings.  Now those points do sound appealing.

So for many many Friday's to come, check back to see how I plan to never be too busy to cook, not too tired to eat well, not considering if it's too hot out, and best of all, skipping trips to the store.  For today, let's talk about...

FREEZER COOKING...

It's time to stock the freezer again with some fast food.  So today's post is on making burritos for the freezer.  Frozen burritos make an excellent fast lunch when you have a microwave handy.  On the plus side:
  • You can control all the ingredients and make them exactly the way you like.
  • It doesn't take much to make a lot of them - 18 in today's case.
  • For about an hours worth of time, you'll have a lunch option for weeks to come.
  • having "fast food" on hand makes for a no-brainer when packing lunches too.
So what to do?  I went for a couple of scratch options on this, and piggy backed the plan with taco night.  Which meant there had to be some fore thought involved.    I went with dried pinto beans which had to be soaked and cooked ahead of time.  I had planned for us to have tacos yesterday so the beans cooking on the same day made for a nice side dish as well.  I also made salsa in a big batch and tripled the amount of taco meat that I prepared knowing that I wanted leftovers to make the burritos with,

Though I did have to make a  cup of rice this morning, most everything was ready to go for making burritos.  These burritos are made of beef, pinto beans, rice, salsa and cheese.  Since it's all going into the freezer, it didn't matter that my leftovers were cold. 

 The Process...
Chose your ingredients to layer.  I work with a large table spoon.  Here I smeared a spoonful of beans across the burrito shell, distributed the taco meat and rice mixture across that, layered in a spoonful of salsa, and topped it off with a sprinkle of cheese.

pinto beans, tacomeat and rice mixture, salsa, and cheese 
  

Fold in the edges of the burrito. 
Sides first - this will keep ingredients from falling out when you eat it.  
 
Fold the bottom up until closed.


Add it to the growing stack and repeat.


That's it, and the possibilities are endless.  Throw in whatever you like best.  So let's review...

  1. Rinse and soak dry beans overnight(I used pinto beans).
  2. Put beans in crockpot the next day and cook 6-8 hours on low.  When the beans are done strain and reserve the liquid.  Mash them by hand or puree them in a food processor.  Make sure you only slowly add in so liquid when processing or you may end up with runny beans.  Also, this is the day you may want to do a taco night - just triple the amount of meat being used.  One third is for dinner and two thirds is for the burritos.  I cooked up three pounds of ground beef.
  3. When you are ready to make the burritos, prepare your assembly line with your desired ingredients and begin.  
I used...
  • 18 large burrito shells(3 packages)
  • 2 pounds of ground beef, browned
  • 2 packets of taco seasoning
  • One cup of rice
  • 2 pound bag of dried pinto beans*
  • 2 cups of salsa
  • one 8 oz bag of sharp cheddar
*Note - I ended up with left-over beans.  They freeze well so I just portioned them out onto saran wrap and folded shut and then placed the portions into a freezer bag for future use.  If you don't want to have extras, a one pound bag should be enough.

Remember, it's all about fore thought.  Spend a little time now when you have it and in the future when you need it, you'll have fast food on hand.  These burritos can be microwaved straight from the freezer for three minutes.  Otherwise, if it's more about not wanting to cook dinner, place the amount needed in a casserole dish and cook in the oven at 375 for 45 - 55 minutes.  Serve with a green salad or chips and salsa.

Enjoy, and be thinking of how you can make life easier in the future.

This post was shared at Food Renegade.

Friday, July 6, 2012

Dehydrating

Fast Food Friday...  

"I'm too busy to cook."  "I worked all day."  "I'm Tired."  "It's way too hot out."  "I don't really want to go to the store."   Who hasn't heard or even said these words before?  Should you call for pizza?  Should you pick something up from the nearest drive through?  Nope, neither.  All you need is a little Food Fore-thought.  Fast Food Friday, a planned weekly post, isn't about running out to a local restaurant for take out or calling for delivery.  Fast Food Friday is about having something on hand for those days when cooking just seems impossible or even unappealing. 

With a little planning and preparation, fast food can come straight from our cabinets, pantries, and freezers.  What we are really talking about here is food preservation.  Food preservation can change our future days - take the guess work out of meal prep, allow for an evening of rest not stress, change your grocery bill's bottom line, and of course, nix the expense of drive-thru eatings.  Now those points do sound appealing.

So for many many Friday's to come, check back to see how I plan to never be too busy to cook, not too tired to eat well, not considering if it's too hot out, and best of all, skipping trips to the store.  For today, let's talk about...

Dehydrating

green pepper, zucchini, tomato, and radish 
This week has been busy busy.  So busy that preparing a few simple veggies seemed not do-able.  I simply hate seeing food go to waste.  It's the whole "waste not want not" adage.  What I allow to waste today is gone.  When the day comes that I want... well, too bad.  Now I realize that today I'm just talking about a few veggies, but we all know that seasons change.  When that happens, fresh local veggies are no more.  A trip to the store at that time could suffice. However, I'd be paying more for out of season, non-local produce that I once had but let waste.  It just doesn't seem too smart.  Plus, the whole point here is to plan for future days.

Dehydrated vegetables fit into the plan really well.  For example, today I'm planning for future meals of soup.  Come winter when my excuses abound for not cooking, I'll be able to throw some chicken stock, beans/pasta, and dehydrated veggies into the crockpot and voila.  Pair it with some crusty French bread made on a less tiresome day and dinner is served.


Another nice thing about dehydrating is that you can do a little at a time.  You don't have to have a ton of veggies to make this work.  Like today, I'm dehydrating two small zucchinis,  one medium sized Daikon radish, four cherry tomatoes, two green peppers, and two small jalapenos - a little bit of this and a little bit of that.  The results will NOT be astounding size wise.  In fact, you may look at the picture and say,"You're saving what?".  Hehe.  It's OK.  It's all part of a bigger picture.  A few nice things about dehydrated food - it takes up very little space, a little goes a long way, and you can keep adding to it with no ill effects.

So what will my future fast food be? 

tomatoes, radish, and zucchini added to previously dehydrated onion and carrot
Minestrone Soup 
1 cup of dehydrated veggie mix (carrots, tomatoes, zucchini, onion, and radish), 1 cup of miniature pasta shells from the pantry, 1/2 c of red kidney beans (soaked), 1 tsp of garlic powder, salt and pepper to taste, and 5 cups of chicken stock.  6-8 hours in the crockpot on low.  Can certainly add some leftover cooked ground beef or chopped chicken to make for a heartier meal.


What future fast food plans are you making?

Tuesday, June 12, 2012

When a Plan Comes Together

Who doesn't like it when a plan comes together?  It occurred to me that if I didn't want to, I didn't have to go to the grocery store this week (at least not for dinners).  Skipping a trip to the grocery store has been wishful thinking of mine for some time now.  Thanks to a little planning, skippin' is beginning to look like a real possibility.

Sweet Gherkin pickles and Sloppy Joe Sauce


The plan I've been working is this:
  1. Purchase a large supply of meat to stock the freezer.
  2. Join a CSA for fresh local produce.
  3. Build a respectable pantry stockpile.
  4. Preserve food for future use.
Happily, I purchased a 1/4 beef from Sevens Sons this past week.  I am hoping that the 90lbs of beef will last a good six months for our family of five.  We average eating beef about three times a week.  This is the third time I've purchased from them.  I've found the meat to be very lean, tender and tasty.  Plus, I like that it's local.

Back in February, I rejoined our local CSA.  This will be our second year participating.  We are into week two of the season and off to a good start.  This past week, we enjoyed strawberries, romaine lettuce, asparagus, knob onions and radishes.  It's nice having this paid for in advance.  Now, it's just a matter of picking it up every week which is no trouble at all.

When I say "respectable stockpile", I just want you to know that you won't be seeing me on TV for extreme couponing or prepping.  I don't have a basement or garage lined with shelves bursting with consumables.  Although I do use coupons and take advantage of a good sale.  I did get twenty free bottles of salad dressing by using coupons once.  Yep, we used it all :)      Seriously though, most of my pantry is stocked via my Sam's Club membership.  I tend to buy only the basics - flour, sugar, yeast, rice, pasta, etc..

As for preserving food, I am always thinking about how to make what we have stretch and last.  I have begun canning, tried dehydrating, and acquired a second freezer with then intentions of making food last and making it more cost effective.  I also go by the saying "waste not, want not".  If a meal provides extras for us, those extras go to use.  For example, a weekend breakfast of homemade sausage and cheese English muffin sandwiches makes seven.  We eat five and the other two go in the freezer to be used later as sandwiches for my husband's lunch.

So what are we eating this week?

  • Grilled steak  with asparagus 
  • Sloppy Joes with sauce that I canned last fall 
  • Homemade pizza with premade crusts and sauce from the freezer
  • BBQ chicken sandwiches on homemade pretzel bread rolls
  • Patty Melts with mac and cheese
  • Tacos and salad
Beef and produce from local farms ~ dry goods from the pantry ~ everything else from the freezer 

The plan is coming together.