FAST FOOD FRIDAY...
"I'm too busy to cook." "I worked all day." "I'm Tired." "It's way too hot out." "I don't really want to go to the store." Who hasn't heard or even said these words before? Should you call for pizza? Should you pick something up from the nearest drive through? Nope, neither. All you need is a little Food Fore-thought. Fast Food Friday, a planned weekly post, isn't about running out to a local restaurant for take out or calling for delivery. Fast Food Friday is about having something on hand for those days when cooking just seems impossible or even unappealing.
With a little planning and preparation, fast food can come straight from our cabinets, pantries, and freezers. What we are really talking about here is food preservation. Food preservation can change our future days - take the guess work out of meal prep, allow for an evening of rest not stress, change your grocery bill's bottom line, and of course, nix the expense of drive-thru eatings. Now those points do sound appealing.
So for many many Friday's to come, check back to see how I plan to never be too busy to cook, not too tired to eat well, not considering if it's too hot out, and best of all, skipping trips to the store. For today, let's talk about...
Pizza Crust for the Freezer
Last Friday, I shared that I buy pizza ingredients in bulk to save money. Having pizza on the menu once a week can be expensive if you're eating out. We are frequent-flyers when it comes to eating pizza. Considering that a month's worth of take out pizza was costing us $100+, something had to give. So I began making pizza at home. We now eat pizza every week for $25.00 a month. That's quite a savings. So it totally makes spending a little time preparing crusts and portioning ingredients worth it.

(makes three crusts)
9 cups of flour
2 TBSP of yeast
1 TBSP of salt
1 TBSP of honey
4 TBSP of olive oil
2 1/2 cups of warm water (110 -120 degrees)
Start by adding 3 cups of flour and the other ingredients to
your mixing bowl. (Reserve 6 cups of the
flour.) Set mixer on low for three
minutes. When mixture resembles smooth
cake batter, begin adding three cups of
additional flour one cup at a time.
Mixture will become stiff like cookie dough. At this time, switch to working with a dough
hook or turn out onto a floured surface to knead by hand. Working with a dough hook, you want to add in
an additional 2 1/2 cups of flour slowly until dough forms a solid ball and the
sides of your mixing bowl is clean.
Kneading by hand, you will knead in the 2 1/2 cups of flour slowly until
the dough forms a clean ball that is no longer sticky.
Place dough into a large bowl and cover to rise with a damp
warm towel for one hour. Dough will
double in size. After the hour is up,
flour the back of your hand and press down dough. Turn dough out onto a floured surface and
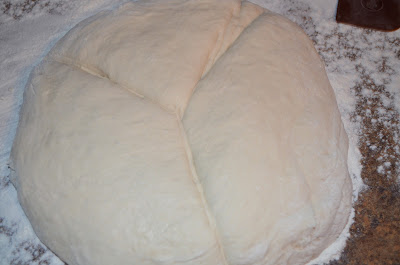
begin pressing it in to a flat circle. Score
the dough with a large Y which will evenly divide it into thirds. Cut dough into thirds. Working with one piece of dough at a time,
form piece into a ball and then press flat onto the floured surface. Flip dough
and begin rolling it out with a rolling pin.
Roll in varying directions to achieve the desired pizza size and shape.
Lightly fold dough in half and then in half again. This makes for easier transfer to a baking
stone. Transfer to the stone and
unfold. If needed, shape dough to better
fit stone. You can do this by gently
pressing or pulling at the dough.
Bake in a 400 degree oven for 6 minutes. This partial bake time allows the dough to
dry and stiffen for easier freezer storage.
Allow crust to cool completely.
Wrap completely with saran wrap.
Crusts can be stacked and put in freezer. Crusts will last for up to two months.
To prepare pizza, preheat oven to 400 degrees. Put frozen crust on to baking stone while
oven is preheating. Add sauce, cheese,
and toppings to your liking. (If using meat topping such as ground sausage, it
needs to be precooked.) Bake for 15 minutes or until cheese is golden
brown. Crust can be placed directly on
oven rack for a crispier crust. If doing
so, use a pizza peel for easy transferring.
Here it is broken down with pics...
Here it is broken down with pics...
Start by adding 3 cups of flour and the other ingredients to your mixing bowl. (Reserve 6 cups of the flour.) Set mixer on low for three minutes.


Begin adding three cups of additional flour one cup at a time. Mixture will become stiff like cookie dough. Add in an additional 2 1/2 cups of flour slowly until dough forms a solid ball and the sides of your mixing bowl is clean.

Place dough into a large bowl and cover to rise with a damp warm towel for one hour.

Dough will double in size. After the hour is up, flour the back of your hand and press down dough. Turn dough out onto a floured surface and begin pressing it in to a flat circle. Score the dough with a large Y which will evenly divide it into thirds. Cut dough into thirds.


Working with one piece of dough at a time, form piece into a ball and then press flat onto the floured surface. Flip dough and begin rolling it out with a rolling pin. Roll in varying directions to achieve the desired pizza size and shape.


Lightly fold dough in half and then in half again. This makes for easier transfer to a baking stone.


Transfer to the stone and unfold. If needed, shape dough to better fit stone. You can do this by gently pressing or pulling at the dough.


Bake in a 400 degree oven for 6 minutes. This partial bake time allows the dough to dry and stiffen for easier freezer storage. Allow crust to cool completely. Wrap completely with saran wrap. Crusts can be stacked and put in freezer. Crusts will last for up to two months.

So, enjoy, and be thinking of how you can make life easier in the future.
This post is shared with Food Renegade.


Begin adding three cups of additional flour one cup at a time. Mixture will become stiff like cookie dough. Add in an additional 2 1/2 cups of flour slowly until dough forms a solid ball and the sides of your mixing bowl is clean.

Place dough into a large bowl and cover to rise with a damp warm towel for one hour.


Working with one piece of dough at a time, form piece into a ball and then press flat onto the floured surface. Flip dough and begin rolling it out with a rolling pin. Roll in varying directions to achieve the desired pizza size and shape.


Lightly fold dough in half and then in half again. This makes for easier transfer to a baking stone.


Transfer to the stone and unfold. If needed, shape dough to better fit stone. You can do this by gently pressing or pulling at the dough.


Bake in a 400 degree oven for 6 minutes. This partial bake time allows the dough to dry and stiffen for easier freezer storage. Allow crust to cool completely. Wrap completely with saran wrap. Crusts can be stacked and put in freezer. Crusts will last for up to two months.
Since we always make pizza in twos, I make this recipe twice so that I have six crusts going into the freezer. Now for the next three weeks, I'll have the makings for pizza on hand. Which is nice for saving money, but also when cooking efforts need to be kept to a minimum. Once again, it's about spending a little time now when you have it to make life easier in the future.
So, enjoy, and be thinking of how you can make life easier in the future.
This post is shared with Food Renegade.
No comments:
Post a Comment